Monday 4 November 2013

December Daily album progress

I'm still busy working on my December Daily album. Continuing on my album's theme of 20 December/Christmas traditions that are important to me and my family, this spread in my December Daily will document some of the fun things that we love to do as a family when the kids are on their Christmas school holidays. Being Aussie means that not only does Christmas fall in the middle of Summer, it also falls in the middle of our school Summer holidays. The kids typically have 6-7 weeks off school, so those weeks (particularly the December weeks) are usually full of lots of swimming at the beach or in my Mum's pool. As most of the photos that will go on this layout will no doubt be water activity shots, I decided to use my favourite aqua as an accent colour only on this double-page layout.


The left-hand side of the layout (pictured above) is my favourite of the two pages - I love all of the colour and the tiny bits and pieces!


The filler card from the left-hand side was made myself from a 3x4 inch piece of tone-on-tone red chevron paper from the Simple Stories December Documented range, upon which I layered embellishments and alphas from Simple Stories Sn@p (pink alphas), Simple Stories' Smarty Pants range (school word sticker), Studio Calico (gold stars and speech bubble), October Afternoon (labels), and Crate Paper (gold glitter thickers). I've left the label at the top of the filler card blank so that I can stamp the date on it come December when I've taken the photos to go with the page.


The card above is designed to hold some journaling about all of the fun things we do on my kids' December school holidays as a family. I knew I'd probably have a lot to say, so I thought I'd write my journaling on a note and tuck it into a vellum envelope (I removed the envelope's flap) instead of trying to cram it all onto one 6x4 inch journaling card. Again, I made it using a piece of chalkboard-look paper from the Simple Stories December Documented range as a base before layering some red striped cardstock (cut from a 6x8 inch page that came with my Sn@p album), a gold tag from a Studio Calico Project Life kit, and a gold glitter number 8. Later I noticed that this spread was in fact number 7 in my album, NOT number 8, so since taking my pics I have changed the number on the tag. Oh well, no harm done :)


After constructing the base of the card, I added the little vellum envelope and layered some bits and pieces on the front of it - a pink "awesome" word bubble cut from a piece of Simple Stories Sn@p 12x12 paper, a green dotty Sn@p washi tape sticker, an old piece of black ribbon from my beloved Love Elsie collection, a red die-cut label by October Afternoon, a gold star by Studio Calico, an aqua camera flair button from Simple Stories Sn@p range, and some red sequins. Finally, I tucked a red striped paperclip onto the edge of my vellum envelope. When I write my little note to tuck into the pocket, I'll attach it to the pocket on the inside with the paperclip so that it won't fall out.


The right hand page of this spread will document photos that again, will be predominantly blue/aqua-based water action shots, so I wanted to avoid using aqua on this side of the layout. I'm anticipating that these photos will also be quite busy, so I wanted to include some filler cards that didn't have too many embellishments on them. I used two cards from the new Simple Stories Snap 3x4 Christmas pack. An old piece of pink and red dotty ribbon, a couple of gold stars, a chalkboard-look border sticker (also by Simple Storeis) and some sequins did the trick. I love how adding those few extra little bits and pieces to the plain cards makes them look that little more Christmassy :)

If you are new to my blog and my December Daily album, I have posted some info in a previous blog post HERE regarding what album I am using and how I went about putting together my own kit for my album. You can also see my completed album foundation pages to date HERE, and find some ideas for what to document in your own December Daily album HERE.

Thanks for popping by today! I'll be back in the next couple of days to share my other completed foundation page in my December Daily album with you...provided this flu of mine gets better, not worse ;)

See you soon :) xx


Sunday 3 November 2013

Overwhelmed


I just wanted to drop in and say thank you SO much to all of you who have left me a comment or message here or on Facebook in regards to my December Daily posts. I feel very humbled at your kindness and thankfulness. It's really wonderful to hear how my posts have inspired you or helped you with your own December Daily albums! You have helped me to have more faith in myself and have inspired me to continue sharing my creations here on my blog. Follow my blog with Bloglovin if you'd like to keep up with my future creative endeavours, too. Thanks again everyone for your support, from the bottom of my heart. Happy creating :)

(Artwork by Yao Cheng, via Pinterest)

Tuesday 29 October 2013

My December Daily (Part 3) - putting your album together

Hi everyone! I am really excited to share with you some details about my December Daily album and process today :) I absolutely love all things Christmas, so this is a project that is really close to my heart. I have a lot to share, so I have written three separate posts. Part 1 (CLICK HERE) details how to put together your own December Daily kit, while Part 2 (CLICK HERE) gives you some ideas for photos and stories that you may like to document in your own December Daily album. In today's final post of my series, I will share with you pics of all of the foundation pages that I have completed in my album to date and give you a little info about my process regarding how I put my December Daily album pages/layouts together. I will also show you how you can embellish pre-made filler and journaling cards, and some ideas for how you can layer embellishments to create your own unique Project Life-style cards too. Enjoy :)

In starting my December Daily album, I chose not to decorate my album cover first up. When completing projects like this in the past, I have found that sometimes I can get too hung up on how I want the cover to look, and I have found it much easier to put it together later, so I will leave decorating the front cover of my album (and completing my title page and foreword) until I have finished putting the rest of it together. It's much less stressful for me that way :)


The photo above is an example of how I typically start putting together a spread in my album. This spread will be all about our favourite Christmas movies (left-hand side) and story-books (right-hand side). I start by choosing cards which will suit the theme of the photos that are to go in each spread, and if I don't have any cards that are exactly what I am after, I'll slip a piece of coloured paper in the pocket instead for the time being. Later I will come back and use that piece to create my own card for the pocket it occupies. I slip pieces of paper or cardstock in the pockets that are to hold photos and write a note on them regarding what photo I want to include. This makes it a lot easier to go back and finish off the spreads later on. I go ahead and do this for each spread in the album before I embellish anything at all. If you don't already do this, go ahead and give it a go. You might find it helps you too.

Generally I will complete one spread in my album at a time, layering embellishments on my cards and inserts before sticking anything down, before I move on to the next spread. I also adopt this same process in completing my Project Life spreads in my regular 12x12 Project Life album. The photo below is an example of how I do this. 


I love to embellish standard, pre-made filler and journaling cards. I don't scrapbook in 12x12 or 11.5x8 size anymore, so Project Life is the only form of memory keeping that I do now so I embellish my spreads just as I would a normal scrapbooking layout. Below is an example of how I embellish my cards. The card on the left is a plain Simple Stories December Documented 3x4 inch filler card. You can see in the card on the right how I rounded the corners, added an old piece of ribbon from my stash, a die-cut arrow, and a star sticker to it to make it look completely different. I love it :)


Below is an example of a 4x6 inch journaling card that I have made myself from scratch using a piece of tone-on-tone green patterned paper from the Simple Stories December Documented line as a base. Again I rounded the corners before layering some stickers, ribbons, a digital printable, a chipboard holly embellishment and some enamel dots to create a unique card that's ready for journaling to be added later on. I always hand-write my journaling so if you chose to type yours or print it out using a computer, you'll need to add the journaling before you stick any of your embellishments down.


Below is a filler card that I made using a piece of chalkboard-look patterned paper (also from the Simple Stories December Documented line) and a mixture of letters from different alphabet sets. If my alphas don't match my colour scheme (as was the case with the large ampersand on this card), I won't hesitate to paint or ink them with colour to them to make them work. They key to making this look work is to mix alphas of different sizes, shapes, and dimension (mix stickers with chipboards).  It gives the card texture and I really love the quirkiness this look adds to my spreads. 


 Here's some photos of the spreads that I have completed so far in my December Daily album. These are all double-page spreads, but some of my spreads further into my album will only need one page to complete them. I am numbering each spread from 1 to 20 as I work, to match in with my list of traditions that I am documenting in the album. Come December, I will add the photos and journaling to my entire album.


The spread above serves as kind of a stand-alone topic in my album. I live in Australia (Queensland) so for me, Christmas means Summer - swimming in my mum's pool or at the beach with my family, eating fresh prawns and mud crab, drinking a cold beer on a stinking hot afternoon, and evening thunderstorms. Looking for a way to use those snow-themed embellishments that inevitably always come with Christmas-themed scrapbooking collections, but which naturally don't apply to us here in Australia, I came up with this layout. I've documented how it never snows here in Australia for Christmas and how our Christmas falls in the middle of a sweltering hot Summer. I think it's my favourite in the whole album - I love it :)


The first spread proper in my December Daily (above) will document our Christmas tree. We always put it up and decorate it on December 1st so it was only natural that I make it the first of our Christmas traditions to document in the album. Again, photos and journaling will be added in later.


The spread in the photos above will document how we decorate our house for Christmas. I made a few extra 4x6 inserts to go between two 6x8 pages in my album. I like how it adds a little more room for a title, some journaling, or photos without having to add a full extra page or two to the album. In this case, I cut some old printed transparency that I had and added the spread's title to it. Love this look!


The spread above will document how my kids give their classmates at school a Christmas card accompanied by a candy cane every year. This is a really important tradition for them and it wouldn't be a December Daily album if I didn't include it. It'll be a special couple of pages to look back on and remember when they are all grown up, that's for sure.


Music is an important part of Christmas in our house. The pages above will document all of our favourite Christmas tunes. My children also learn to play Christmas songs on the recorder every year so I couldn't not include something in my December Daily about that. My daughter also plays violin at school and every December the school orchestra and band hold a concert. The red "MERRY" die-cut card is actually a flip-up card that I made myself which will hold a photo of her playing in the orchestra and some journaling about what Christmas music means to us as a family.


All four of us in our household are prolific list-makers, and with all that there is to do at Christmas, we always have a stack of lists to write. The December Daily spread pictured above will document that. I've included another 4x6 insert here between the two full-sized pages to hold the title of the spread, and a pocket to hold our many lists we all write - my December Daily traditions to document list, the kids' wish lists, shopping lists, lists of things to make, lists of things to do around the house, lists places to go and thing to take to each place on Christmas day...it's endless in this house, I tell you! We'd be lost without our lists :)


The pictures above show my most recent finished December Daily album spread. It will document how my family and I love to go to the shopping in December and gaze in awe at the beautifully decorated shops and shopping centres, visit the store Santa, and admire all of the lovely things for sale that we'd love to receive from Santa for Christmas. This spread is another of my favourites in my December Daily - I love how the stacks of embellishments and words look with the gold title.

I hope you managed to stick with me through my mammoth post! Thank you so very much for joining me for a peek into my December Daily album and the processes that I use to create it :) You will be able to see more of my December Daily here on my blog soon where will share photos of my album as I complete more spreads in it. I will be sure to share pics as I begin adding photos and journaling to it later on, too. Happy December Daily-ing everyone :) 

Karen xx 

My December Daily (Part 2) - ideas for what to include in your album

Hi everyone! I am really excited to share with you some details about my December Daily album and process today :) I have a lot to share, so I have written three separate posts. Part 1 (CLICK HERE) details how to put together your own December Daily kit, while Part 3 (CLICK HERE) shows pics of all of the foundation pages that I have completed in my album to date and gives and a little info about my process regarding how I put my December Daily pages together. In today's post (Part 2 of my series) I will share with you some ideas for photos and stories that you may like to document in your own December Daily album. Enjoy :)

You may feel like your December is not “interesting enough” to devote a whole album to. Please, don’t think that! You don’t have to go to special Christmas parties, do something different every day in December, or have a fancy Christmas Day to make a December Daily album :) You don’t have to take a photo each day to include in your album, either. I am not. As I said in my last post, don't be afraid to make your album completely your own.

I have chosen to document 20 December/Christmas traditions that are very precious to me and my family. I wrote them all down in list form and pinned the list to the wall in my studio so I can easily see what topic to document next in my album. Later I plan to put the list into my December Daily album too (more on that in the future). I've included my list below for you to give you some ideas for things you may like to include in your album. Please excuse it being a little rough around the edges...keeping it real :)


I have found some other layout/photo prompt lists that you might find helpful in deciding what to include in your own December Daily too. Here’s the links to them for you…

*Ali Edwards – 25 awesome prompts, direct from the lady who first developed December Daily.

*Scrapbooks Etc. – downloadable holiday photo checklist. For those of us who enjoy a Summer Christmas, instead of the snow-themed elements in this list, you could take a photo of footprints in the sand, building a sandcastle, a Summer thunderstorm, your kids’ favourite Christmas t-shirts/new swimmers/Christmas day outfits, etc. Fun ideas to try! 

*Katie Scott – Katie’s list of stories to include in her December Daily. I love her ideas!

*Kasia – as part of her “Inspire Me Christmas 2012” series, Kasia (of Worqshop blog) designed a downloadable December Daily prompt list. It’s fantastic! Scroll down to the bottom of her blog post and click the link to download it. 

Thank you so much for reading along today! I can't wait to share some pics from inside my December Daily album with you in my next post, along with some details about the how I put together my album and embellish my filler & journaling cards. See you soon :)

My December Daily (Part 1) - how to create your own album kit

Hi everyone! I am really excited to share with you some details about my December Daily album and process today :) I absolutely love all things Christmas, so this is a project that is really close to my heart. I have a lot to share, so I have written three separate posts. Part 2 (CLICK HERE) gives you some ideas for photos and stories that you may like to document in your own December Daily album, while Part 3 (CLICK HERE) shows pics of all of the foundation pages that I have completed in my album to date and gives and a little info about my process regarding how I put my December Daily pages together. In today's post (Part 1 of my series), I will share with you some details on how I organize my December Daily album supplies and how you can put together your own December Daily kit. Enjoy :)

As some of you may already know, December Daily is an album concept that was developed by scrapbooker Ali Edwards in order to document and celebrate the month of December in the lead-up to Christmas Day. If you aren't familiar with December Daily, you can find out more about it on Ali’s blog HERE. Ali’s idea has become very popular among scrapbookers the world over, particularly with the introduction of Project Life to the scrapbooking world. The Project Life method of memory-keeping is an awesome way to construct your December Daily album, and as a devoted Project Lifer, it is the format that I am using to construct my first ever December Daily album. 

For me, December is a very hectic time full of Christmas goings-on (plus my birthday is on Boxing Day), so I have already started gathering my supplies and constructing my December Daily album. It's only October, I know, but knowing how my life can get busy at a moment's notice, if I don’t get my album put together early, I won’t ever finish it. My plan is to have my album constructed so that, come December, all I have to do is add in the journaling and photos as the month progresses and it’s done. This will really let me enjoy the holiday season all the more and add to the magic and excitement of counting down to Christmas and my birthday...December is certainly my favourite time of year! Here’s some details on the process I have used in constructing my own December Daily kit. Enjoy :)


I already had on hand this cute little red and kraft-coloured 6x8 inch Simple Stories Sn@p album/binder so I decided to use that for my December Daily album. I love how these albums come with everything you need to complete an album - cardstock inner pages, pocket page protectors, plus chipboard dividers. I purchased extra pocket page protectors for my album too as I have a LOT I want to add to it. The beauty of December Daily is that you can make your album any size you like, and include as much or as little as you like. There doesn't have to be any hard and fast rules so don't be afraid to make it your own. It's completely up to you :)

Many scrapbooking kit companies have released December Daily kits this year for you to buy. Some include Project Life cards in them (and even an album plus pocket page protectors in some cases too). They are an awesome idea if you want something that is themed, hassle-free, and easy to put together. Scrapbooking companies such as Simple Stories, Echo Park, My Mind’s Eye, Carta Bella, Basic GreyStudio Calico, etc. have released Christmas scrapbooking lines that are perfect for Project-Life-style December Daily albums too! Have a browse online and see what you can find if you think that is an option you'd like to explore. As I already had an album on hand, and a lot of embellishments in the colour scheme I'd chosen, I decided to put together my own December Daily kit using items I already had in my stash plus some newly purchased items. 

When I make Project Life pages in my 12x12 inch album, I usually put my own kit together from my stash based on a set colour scheme that I may have in mind for my spread. If I need to, I will then buy anything that I don’t already have which I need or particularly want to use to fill in the gaps to put my page together. I find that doing things this way helps me to use what I already have, create spreads faster, and cut down on the amount of money that I spend on supplies. This system works really well for me so I have used it to put together my own kit to create my December Daily album from too. 


As you can see from the picture of my self-made kit above, the main colour scheme that I am using for my album is aqua blue, red, lime green, pink, chalkboard/black, white, and gold. I use this colour scheme when decorating my home for Christmas each year, so it was a natural choice for me. If you are stuck on working out what products you want to use for your December Daily, I suggest choosing a colour scheme first. 


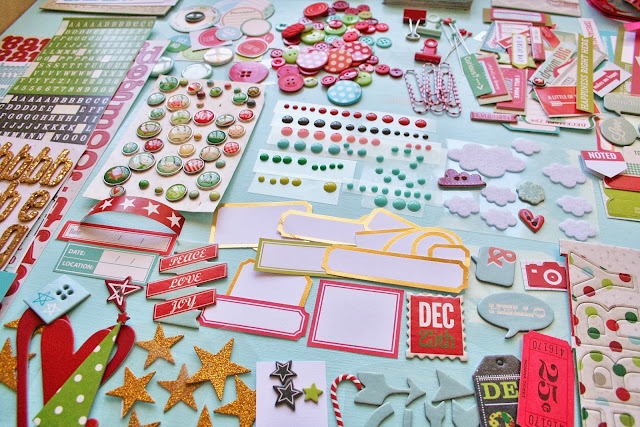
After choosing my colour scheme, I went through my supplies and pulled out all of the papers and embellishments I had that were in keeping with my colour scheme for my December Daily album. The embellishments I pulled out are those which I use a lot in my Project Life scrapbooking - patterned papers, sequins, ribbons, trims, buttons, enamel dots, paper clips, decorative pins, digital printables, tags, stickers, chipboard, alphabets, and little word stickers. I know there is a LOT of stuff in my kit, but I have done this because I find that if I have more options at hand when I am putting my spreads together, the less time I waste rifling through the rest of my supplies and my pages come together a lot more quickly and easily. 

Try this method out for yourself, too. Go through your stash before you purchase anything and see what you have in the colours you want to use for your album. Not everything has to be Christmas-themed, either. You might be surprised at just how much you already have that you can use in your December Daily :) If you want to, you can also throw in some stamps, paint, ink, mist...whatever you want. Of course, you can add as little or as much to your own kit as you like. I do my Project Life pages using an embellished, scrapbooking style, but if you prefer a simpler Project Life style, your kit won't need to be as full as mine.


Next, as I didn't have any Christmas-themed products in my stash apart from some brads and a few tags, I purchased some papers, embellishments, and alphas from the Simple Stories December Documented line and some of the Simple Stories Sn@p Christmas Project-Life-style 6x4 and 
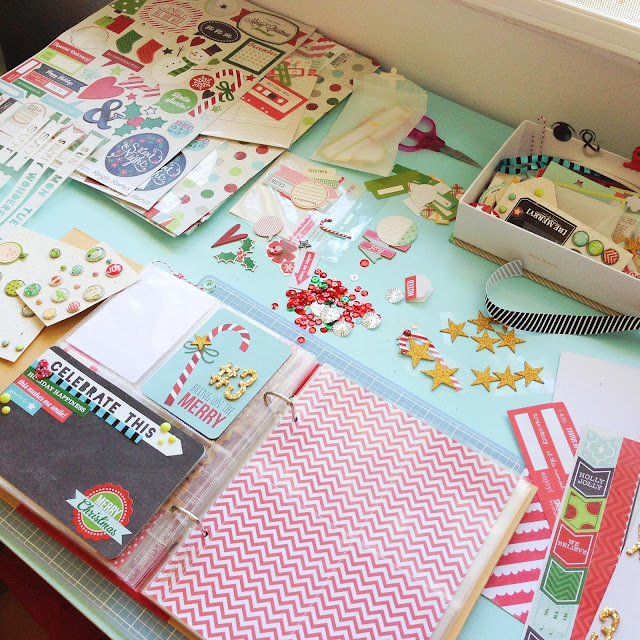
3x4 cards. When I had everything I wanted, I corralled all of my bits and pieces in some things I already had - a box, basket, bowl, and some little glassine envelopes and plastic bags (sorted according to type of embellishment). I put everything (including the alphabets and my filler & journaling cards) in a drawer housed in a rolling drawer unit which sits next to my desk in my studio, with my 12x12 papers on top of the unit in a 12x12 resealable plastic bag. This enables me to pull everything out and tidy it up quickly and easily whenever I need or want to. It might sound like a bit of work to set it all up like this, but it really doesn't take long at all, and it's a great way to keep all of your bits and pieces for your album in the one place. 


Try doing this yourself with all of the things you have pulled out for your own kit. Put them all together in the one spot, handy to your work area, so you can grab them and work on your album whenever you like. It doesn't have to be fancy - go with whatever works for you. It's a big help to my creative process when I do this, and it may just help you, too.

Thank you so much for reading along today. It's been a pleasure to be able to share some of my December Daily album process with you and I hope that you have gathered some ideas that will help you along as you work on your own December Daily. Next post I'll share some ideas for topics you may like to journal about or photograph to include in your album. See you soon :) 

Tuesday 28 May 2013

Project Life - my process

Hi again everyone :) In my last post I talked about how I discovered Project Life and why I love it so much. Today I thought I'd follow on from that a little and tell you how I put together my Project Life layouts using my latest layout as an example.

Many people dedicate one Project Life layout/spread to each week of the year. I decided to organize my album into months, and to scrap my layouts based around the major events that took place during that month. More on that in another post ;D The best thing about Project Life, in my opinion, is that you can make your layouts and album suit your own style and time constraints. There are no rules. How awesome is that?!


Anyway, sometimes in a month I'll have a bunch of significant things that happened and I may only have one photo for each event (or no photos), so in that instance I'll combine all of these things into the one Project Life layout. That's exactly what I did with my latest layout (pictured above). With the lack of photos for this layout, I focused instead on getting those stories down and making it all look cohesive. There is a lot of journaling, and that's totally okay - I was still able to document the important things in our life for us to reflect back on in the future, and that (for me) is what Project Life is all about.

I usually start my layouts by gathering my photos. I then look for colours in the photos that I can match to papers, 3x4" and 6x4" journaling and filler cards, and embellishments in my stash (I tend to not use products from the one product line or manufacturer on my layouts - I mix and match from many different ones). I will then go through my stash and pull out bits and pieces in the same colours to form my own kit, of sorts. Finally I start assembling my cards and adding the photos and journaling.


I must confess that this layout had me stumped for a while because I don't typically use pink and pale yellow on my layouts. My partner, David, had a tooth out in March. It was a big thing for us because he was in a lot of pain for the month. I didn't want to put a photo of David with a swollen face and looking miserable in our album, so instead I found a diagram on a medical website online that showed the problem he had. I studied biology and nursing at university, so I am naturally drawn to scientific diagrams. It turned out great because it's an easy way to explain to the kids what was wrong with David (he's all better now). As it turned out, the colours in the diagram actually formed the jumping off point for me to go ahead and choose the colours for the rest of the layout. Here's some close-ups of the details of the rest of the 6x4 and 3x4 cards on the layout...


The gold glitter Thickers from the Maggie Holmes line by Crate Paper were perfect to journal about us having to look after a cat named "Goldie" during March, especially because I didn't have a photo of Goldie. I echoed them on two of the other 6x4 cards so that the layout would flow nicely. Other than that I used the following on this layout - Dear Lizzy Lucky Charm papers and die-cuts, Simple Stories Urban Traveller red alphas, Becky Higgins Project Life grid journaling cards, a My Mind's Eye memo card from the Noteable collection, a journaling card and yellow typeset letter stickers from the Sn@p line by Simple Stories, some Studio Calico printable journaling cards and embellishments, Pebbles Seen & Noted dymo-style word stickers, Studio Calico stickers and chipboard arrows (from the Sundrifter, Here & There, Snippets, and Atlantic lines), Studio Calico Atlantic vellum anchor die-cut, Glitz Designs Unchartered Waters yellow anchor paper, Simple Stories Urban Traveller and 24/7 word stickers, an old Heidi Swap chipboard star that I painted white, an old KI Memories Love Elsie word sticker and label sticker, an old KI Memories chipboard word, and some old sequins and buttons from my stash.


You'll notice in the main picture of this layout that I have a smaller 8x8 layout beside the main 12x12. I had only 2 photos from our Easter weekend so I decided to make a smaller layout to sit beside the larger one. I was really stumped for ideas for it until I came across a beautiful layout by Elizabeth Kartchner that featured some red striped paper and navy paper from her Dear Lizzy Lucky Charm line. I borrowed her paper choices and idea for a collection of embellishments at the top of the page, added a title using the gold glitter Thickers, and sprinkled around some embellishments, stamping and journaling and called it DONE. It turned out to be more like a traditional scrapbooking layout, actually. Remember how I said in my last post that those things really used to stress me out? Well, this one did just the same so I am not in a hurry to do another. I'm quite happy to stick to my little 6x4 and 3x4 Project Life cards in future - they are WAY less stressful!

Well, that's a very basic run-down of how I construct my Project Life layouts. No doubt you can work out how I have layered bits and pieces to get the effect I wanted so I have left that info out. If you have any questions though, please don't hesitate to ask.

Monday 27 May 2013

Project Life, my way

I first discovered the Project Life method of scrapbooking in December 2012 via Pinterest. A friend of mine shared a pin that mentioned it and I thought, "Huh? What's this Project Life thing? It sure looks like fun. Let's Google it." So I Googled it. And I found this. And then this. Instantly I was hooked!

Before I ordered a Project Life kit though, I decided to do some more research about it online. I quickly discovered a plethora of inspiring scrapbookers that did Project Life but they made theirs a little different - they used normal scrapbooking products on their pages. I really liked that idea so I decided not to order a kit. Instead, I bought some page protectors, some 3x4 and 4x6 grid journalling cards, and some normal scrapbooking supplies, printed some photos, and got to work.


Now, I used to scrapbook many eons ago and honestly, it used to really stress me out sometimes. I'd get so caught up in the process of taking the perfect photo for a page, narrowing it down to using just one or two ideas for the page, making the page, and trying to get it all "perfect" (I am very critical of the things I make) that I would feel seriously deflated by the end of it. Not a good way to feel about something that is meant to be fun, so I stopped scrapbooking.

Scrapbooking on my Project Life layouts is so much more fun! Unlinke with traditional scrapbooking, I am not stressing over making my layouts for my Project Life album because essentially I am creating 6-8 mini scrapbooking layouts on the one 12x12 inch page. I can make each of those little layouts different - one can be a photo, one can be journalling, one can be made up of letter stickers and pretty papers and other bits and pieces. I really love doing Project Life this way because it lets me play with many different scrapbooking products and techniques all on the one page, eliminating some major creative anxiety in the process.


Another big thing for me now is that when I do my Project Life layouts, I am using my normal, everyday photos from my iPhone or DSLR camera, be they perfect or flawed. No longer am I focused on taking that one great photo with the sole vision of using it on a scrapbooking layout. I am also writing the stories behind those normal, everyday things that make up our lives, like the kids going back to school and us all struggling to get back into that familiar daily routine, the flood in January, soccer games, a day trip to the beach, birthdays, sick days, etc. Previously, I never scrapbooked half of that stuff. Now I'm taking more photos and telling the important stories behind those photos much more than I ever did in the past which is a fantastic feeling!


I am planning to buy an official Project Life Core Kit designed by Becky Higgins to organize those many boxes of old photos that I have going on at home here (I'm sure I'm not the only one who has boxes of photos lol!). I think the system that Becky has designed is so wonderful for quick and easy memory-keeping and I can't wait to get a kit when the new ones come out in June. For current photos though, I'll continue do Project Life in my own fun and colourful "scrappy" way because it is a fantastic creative outlet for me. I am absolutely loving Project Life!

Tuesday 21 May 2013

Thoughts on Blogging

image from http://featherfiles.aviary.com/2013-05-08/f77694d11/61acc40958154dcab1ce3e9f7c7aa5bf_hires.png

I first started blogging about 8 years ago now and in that time my personal life has seen many, many changes. Throughout those 8 years I have kept a blog (first with Blogger and most recently with Typepad), but over the last couple of years I have not been blogging so much. Online identity theft, cyber-bullying, and maintaining some online privacy in my personal life have become an increasing concern for me. I don't want my family or myself exposed to any unnessary hurt. I no longer felt comfortable in sharing my personal information written in my old posts in such a public format and, to be completely honest, I was feeling very unsure as to whether or not I should continue to blog at all. As a result, early in 2013 I decided to remove all of my posts from my old Typepad blog.

Just recently, however, I had an epiphany. I remembered why I used to blog and why I used to love it so much. My blog began as a place where I could share my creativity with like-minded souls, like you. I loved that I was able to connect with people the world over who were interested in the same things I was or who were inspired by something I had created, shared, or written here. I want that again now more than I ever have.


From today, I am starting over with my blog in this fresh new space. I will focus on sharing about my art and craft projects, my creative process, my studio, and the inspiration behind it all. I am so inspired and excited to start blogging again! I'm a firm believer in following your dreams and in taking time to enjoy those parts of life that make you most happy. Creating makes me happy, as does sharing it with others, so with that I would like to welcome you all to my blog. I hope you will follow along with me as I cultivate a creative life and maybe, just maybe, you will feel inspired to do the same.


(Art by Amy Tan for Design Editior)